
In this episode of my LibreOffice Calc & Python Programming tutorial series I am going to show how to display a text message in a pop-up window.
To do that you need to import the module msgbox that will allow you to use already made functions to display text trough pop up windows within LibreOffice:
import msgbox # to display messages in LONearly there…
Let’s create a function that takes some text as parameter and displays it in a message box:
def msg_box(text):
    myBox = msgbox.MsgBox(XSCRIPTCONTEXT.getComponentContext())
    myBox.addButton("OK")
    myBox.renderFromButtonSize()
    myBox.numberOflines = 2
    myBox.show(text,0,"Watching")
In the first line:def msg_box(text):
We name our new function and define it to get the parameter ‘text’.
Then in the second line:myBox = msgbox.MsgBox(XSCRIPTCONTEXT.getComponentContext())
We define our object myBox using the constructor for class MsgBox from the module msgbox that we have imported.
This MsgBox’s class constructor takes one parameter, the UNO component context that has been used to initialise the Python runtime. Simply it is to gives access to python functions, to all variables, and useful things to be able to use LibreOffice features like the message boxes.
So this line means that we are creating an object of class MsgBox. And we are passing all necessary informations from the LibreOffice environment to the python class, to be able to use its function members and attributes.
In the 3rd line:myBox.addButton("OK")
We are doing exactly as it says, adding a button with the text ‘OK’ to the object myBox that we have created just before, executing the addButton Function from the MsgBox class.
In line 4:myBox.renderFromButtonSize()
This line is to execute the renderFromButtonSize function of class MsgBox for our instance myBox. The default size is 50 pixels, but you can change the size by putting a number in the parenthesis. There is another Function called renderFromBoxSize() which has a default size of 150 pixels.
The names of these two functions are a bit confusing as you would expect the message box to adapt its size according to the size of the text entered in the button… but it is not the case. The size is entered as a parameter.
The difference between both functions renderFromButtonSize and renderFromBoxSize is that the latter creates a box with the exact size as specified, where the first one (..FromButton..) is creating a box with a button with the exact size as specified and adapt the size of the box around, as shown in the image below:

Note that we don’t need to enter the parameter 150 for renderFromButtonSize,
as the default size is actually 150 for this function.
For those who are interested to look at the API for this class MsgBox you can find it here.
In line 5:myBox.numberOflines = 2
This functionality is not doing anything relevant, it does not impact the number of lines for the text box. Maybe it will be adjusted in a more recent version.
In line 6:myBox.show(text,0,"Watching")
This is the function that makes the box to be displayed. The parameters are:text: the text string that is displayed within the message box, (not the button itself).0: is the code for the ‘decoration’. It is used to customise the look of your message box and left entirely at your disposal to do it yourself (nothing pre-defined). So just put a zero."Watching": That is the title for the message window.
To control the exact size of your message box in pixels, you can add and specify a value for the lineHeight attribute before the ‘show’, like in the example below:
def msg_box2():
    myBox = msgbox.MsgBox(XSCRIPTCONTEXT.getComponentContext())
    myBox.addButton("Let's GO!")
    myBox.renderFromBoxSize(300)
    myBox.lineHeight = 100
    myBox.show("Ready?",0,"Message")
I encourage you to read the full code for that MsgBox class and try different way of using it, the best is to play with the different attributes and see the outcome on your screen.
A message box can be used to select different options, each option corresponding to a button.
To retrieve the value of the button that has been clicked you simply need to check the attribute ‘Response’, like in this simple example with two boxes, the first one asking the question “What is your favorite color” asking you to choose between 3 colors, the second box displaying the answer.
def msg_box3():
    #First box
    myBox = msgbox.MsgBox(XSCRIPTCONTEXT.getComponentContext())
    myBox.addButton("Red")
    myBox.addButton("Green")
    myBox.addButton("Blue")
    myBox.show("What is your favorite color",0,"Question")
    print ("Answer: ", myBox.Response)

    #Second box
    myBox2 = msgbox.MsgBox(XSCRIPTCONTEXT.getComponentContext())
    myBox2.addButton("OK")
    myBox2.show(myBox.Response,0,"Answer")
If you try that code you will see that the second box will only appear once you have answered the first box.
You can see on the last line we are displaying the myBox.Response value from the first message box.
note: The ‘print’ statement is useful to check the value on a console like explained in my previous tutorial on how to use a console to help with coding.
There is a limited number of possibilities using this ‘out of the box’ MsgBox class imported from msgbox.py but i does the basic for pop-up message and button clicking. It is a safe introduction to using an existing API. Stay tuned with this space as I will introduce to more complex work gradually.
If you like this tutorial you could buy me a coffee to help me continue writing add-free tutorials.
Thank you!
Related Posts
 LibreOffice Calc & Python: part 9 – Reverse the order of cells content from a cell range
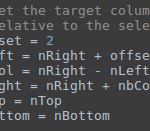 LibreOffice Calc & Python Programming: part 8 – From Python Tuple to Cells Range
 LibreOffice Calc & Python Programming: part 7 – From Cells Range to Python Tuple.
- LibreOffice Calc & Python Programming: part 6 – Type of a Cell content.
 LibreOffice Calc & Python Programming: Annex 1 – Assign a Python Macro to a key.
 LibreOffice Calc & Python Programming: Part 4 – using (APSO) console to print text.